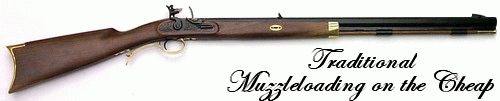
News:

Established July of 2008, and still going strong! 

Main Menu

Getting started in leathercraft

Started by FrankG, October 26, 2008, 11:44:58 PM

Previous topic - Next topic

FrankG

This will be, lets say a primer for leathercraft . I will start with a basic kit needed to make a few usefull items that can be used in our hobby.I'll also include a few resources for tools and supplies that I have used .

Basic Tool List

cutting board of soft material like a 1/8" x 2'x2' piece of tempered hardboard from Home Depot (use the rough side)

ruler , tape measure or yard stick

razor knife with replaceable blades and or leather scissors

soft lead pencil

adjustable stitch groover

stitching wheel in 5,6 or 7 stitch per inch ( a common dinner fork will give 5 stitches per inch)

saddlers stitching awl and haft

2 blunt nosed hand stitching needles (oo size)

needle nose pliers

bees wax

linen thread , Niletex waxed cord, dental floss ( and many others)

contact cement


Suppliers

www.leatherfactory.com

www.siegelofca.com

www.oregonleatherco.com


FrankG

#1
For making things assocciated with our sport of muzzleloading from leather we have four choices that are most generally chosen from.

First will be buckskin either brain tanned or chrome tanned which the latter is commercially tanned . These are used for making clothing ,footwear ,hunting bags ,lacing etc.

Second will be a full grained chap material in a 4 oz. thickness such as blacksmith , diamond tan and various others with names given by the manufactures . This material is a good choice for hunting bags and straps as it has more body to hold its shape and less apt to stretch over time . This also works well for knife sheathes .

Third is saddle skirting or tooling leather as it is also known . This type of leather can be wet and formed or dampened and tooled with carving and tooling like seen on holsters, saddles and such.
This leather is excellent for making belts, holsters ,knife sheathes ,rifle scabbards , saddles and anything that you would like to wet ,form and let dry to retain its shape.
It can be had it different thicknesses from 2oz. to 15oz.

And fourth is rawhide which is hides that have had their hair chemically removed and washed .
Rawhide has lots of uses from lining sheaths , lacing, making ball bags , handle wrapping on knives and hawks or what ever your imagination allows .
It also comes in various weights from 2oz. to a full 15oz. and can be found in deer, goat , pig or cow types with cow being of the thicker material.

FrankG

What I will attempt now is describing the saddle stitch method using two needles and stitching cord.
On buckskin there is no need to run a stitch groove but you will still need to score the material for marking your stitching with the stitch wheel. The chap and tooling leather needs a groove for the cord to lay in to offer some protection from wear where as the buckskin is soft enough it will compress when you tighten your stitch.
Rawhide can be done either way with good results .

The Saddle Stitch

After gluing your work edges together use your adjustable stitch groover set at 1/8"-3/16" and make a definite groove at the edge using the guide to keep it an even distance from edge.

With the stitching wheel or fork imprint your stitch spacing in the groove you made in work piece.

Now take a length of stitching cord 4 1/2 times the length of work to be sewn and thread each end through eye of each needle.

With the awl poke several of the marks left be the spacing wheel through the material while trying to keep the awl slightly twisted to an angle so the holes in the stitch groove look like this  /////////// not this _ _ _ _ _ _  and at the same time holding awl 90 deg to work .

Now take one of the needles and push it through the start of your stitches and even up having equal cord on each side of material for each needle.Take the right needle and push it through the next hole and grasp it on the opposite side and pull it on through taking care not to pull the thread back out of the first hole . Hold the needle and thread out of the way that you just pulled through and push the left needle through the second hole going through the same hole you just pulled the right needle through. Now with each hand grasp the thread one on left one on right and snug the stitch . Now repeat the above steps snugging each stitch as you go . It is slow getting started but with practice comes speed.
When you come to the finish of stitching you can back stitch 3 or 4 stitches to lock them in place .

Whip Stitch

With a whip stitch you follow the same layout as used for the Saddle Stitch . For making the Whip Stitch you use one needle with the cord pulled even length on the needle . To begin you simply pass the needle through the second hole and leave about 1/2" of cord hanging past first hole then bring needle up and over seam and pass needle back through first hole on same side that you started.Now bring the needle up and over seam again and go back through second hole again and up and over seam and into third hole. This locked the beginning now you repeat pulling each stitch tight as you continue to the end then simply back stitch 3 or 4 stitches and trim excess cord or you can tie a knot if you wish.

Running Stitch

The running stitch in my opinion doesnt serve much porpose except for making a drawstring as it doesnt draw up real tight to lock the material together unless you backstitch the whole thing and I prefer the Saddle Stitch .
With the running stitch I use it for drawstrings on pouches such as a ball pouch/bag but can be used to rapidly repair something.
You use the same stitch layout as mentioned above and one needle with cord with cord pulled even on needle and pass needle through second hole right to left leaving 1/2" cord hanging below first hole then bring needle back through first hole on left side below seam and back through second hole on right side and back through first hole on left side all the while overlapping the 'tail 'of cord you left hanging. This has locked the starting point. Now pass the needle through second hole on right side and pull it through to left and snug it up , pass needle through third hole on left side below seam and pull it through to the right and snug the stitch. Continue this lazy zig zag /\/\/\/\/\/\/\ pattern and dont get confused and whip it. When you come to the end you can back stitch or tie a knot .